

Overview
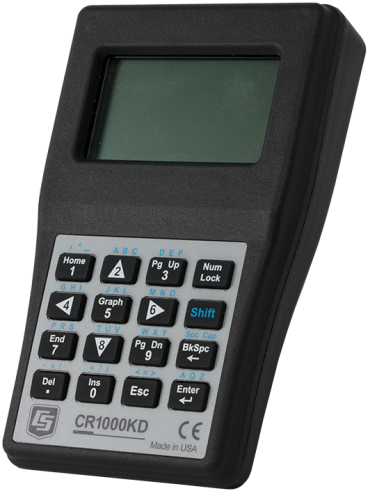
The CR1000KD is a portable keyboard and display screen for our data loggers that have a CS I/O port, including the CR1000, CR1000X/Xe, CR800, CR850, and CR6. It allows you to check the data logger's status, display or plot sensor readings and stored values, and enter numeric data or change port/flag state. One CR1000KD may be carried from station to station in a data logger network.
Read MoreBenefits and Features
- Can be easily moved from data logger to data logger
- Supports custom menus and displays to simplify routine operations
Images

CAD Files:
Detailed Description
The CR1000KD displays 8 lines x 21 characters (64 x 128 pixels) and has a 16-character keyboard. The CR1000KD is powered by the data logger power supply. An SC12 cable connects the CR1000KD to the data logger; the two connectors on the SC12 cable allow the attachment of additional peripherals.
The CR1000KD supports custom menus. With custom menus, you can set up choices within the data logger program that are initiated by a simple toggle or pick from a list in the menu displayed on the CR1000KD (for example, Initiate Sensor Calibration Sequence versus Bypass Sensor Calibration Sequence.)
There is not a CR1000KD Operator's Manual. Operation of the CR1000KD is described in the CR800 and CR1000 datalogger manual.
Specifications
| Temperature Range | -20° to +50°C (operating) |
| Display/Keyboard Description | 8 lines x 21 characters (64 x 1238 pixels) display and 16-character keyboard |
| Dimensions | 10.2 x 15.2 x 1.5 cm (4.0 x 6.0 x 0.6 in.) |
| Weight | 272 g (10 oz) |
Current Drain |
|
| Quiescent | Negligible |
| Active |
|
Compatibility
Note: The following shows notable compatibility information. It is not a comprehensive list of all compatible or incompatible products.
Data Loggers
| Product | Compatible | Note |
|---|---|---|
| CR1000 (retired) | ||
| CR1000X (retired) | ||
| CR1000Xe | ||
| CR200 (retired) | ||
| CR200X (retired) | ||
| CR205 (retired) | ||
| CR206 (retired) | ||
| CR206X (retired) | ||
| CR210 (retired) | ||
| CR211 (retired) | ||
| CR211X (retired) | ||
| CR215 (retired) | ||
| CR216 (retired) | ||
| CR216X (retired) | ||
| CR295 (retired) | ||
| CR295X (retired) | ||
| CR300 (retired) | The CR300-series dataloggers do not have the necessary CS I/O port required by the CR1000KD for connection to the data logger. | |
| CR3000 (retired) | ||
| CR310 | The CR300-series dataloggers do not have the necessary CS I/O port required by the CR1000KD for connection to the data logger. | |
| CR350 | The CR350-series dataloggers do not have the necessary CS I/O port required by the CR1000KD for connection to the data logger. | |
| CR5000 (retired) | ||
| CR6 | ||
| CR800 (retired) | ||
| CR850 (retired) | ||
| CR9000X (retired) |
Documents
Videos & Tutorials
Frequently Asked Questions
Number of FAQs related to CR1000KD: 5
Expand AllCollapse All
-
No. The CR1000KD is designed specifically for use on the CS I/O port of the CR800, CR1000, and CR6 dataloggers.
-
In OS 24 (CR6 OS 01) and later, a user can change constants from the CR1000KD or a terminal emulator without touching the program. The program must contain a ConstTable/EndConstTable construction for this to occur. Because the program does recompile, collect the data first.
-
Yes. After a ConstTable is declared in a program, it can be accessed using the CR850 or CR1000KD keypad display and the standard/default data logger menu. It appears under Configure | Settings.
-
CustomMenu instructions apply to the CR1000KD, CR850, and CR3000 display. Custom menus are not displayed or passed through to the terminal interface.
-
Although it is recommended to use software such as Short Cut for programming, the CR800-series, CR1000, and CR3000 dataloggers can be programmed with the CD100, CR1000KD, or integrated keypads. The keypad can be used to create new programs or edit programs that already exist in the data logger memory.
From the CD100 or CR1000KD home screen, follow these steps to get started:
- Press Enter.
- Select File and press Enter.
- Select either New or Edit.
- To modify an existing instruction, select the instruction, and press Enter.
- To add a new instruction, press Ins, and select Instruction.
Articles and Press Releases
Listed Under
- AP200 - CO2/H2O Atmospheric Profile System
- CR1000Xe - Measurement and Control Datalogger
- CR1000-4M - Measurement and Control Datalogger with 4M Memory
- Granite 10 - Measurement and Control Data-Acquisition System
- Granite 6 - Measurement and Control Data-Acquisition System
- Granite 9 - Measurement and Control Data-Acquisition System
- CR6 - Automated Monitoring Platform
- ALERT100 - ALERT Basic Remote Data Platform with 3 Sensor Inputs and AL200
- ALERT200 - ALERT2 Basic Remote Data Platform with Three Sensor Inputs and AL200
- FluoreSens 10 - Sun-Induced Chlorophyll Fluorescence (SIF) System
- EC150 - CO2/H2O Open-Path Gas Analyzer
- IRGASON - Integrated CO2 and H2O Open-Path Gas Analyzer and 3-D Sonic Anemometer
Privacy Policy Update
We've updated our privacy policy. Learn More
Cookie Consent
Update your cookie preferences. Update Cookie Preferences


